Search This Blog

Friday 28 August 2015

Strawberry Muffins

A friend ordered some muffins to celebrate her little girl's 4th birthday in school :)  Since these would be distributed among the young kiddos, I specially selected from this recipe to modify the flavour because it's really easy to make,  and the produced muffins has a crunchy top and moist crumbs, which kids should love :)


Ingredients
*I used my measuring cup to weight out the ingredients.  200ml/cc is equivalent to 1 cup.

1 1/2 cup plain flour - sieved
3/4 cup castor sugar
1 tbsp castor sugar - for dusting
1/2 tsp salt
2 tsp baking powder
1/3 cup canola oil
1 egg
1/3 to 1/2 cup milk
1 tsp vanilla extract
6-7 strawberries - cut into smaller pieces

Method
1.  Prep muffins tray with 12 cases.
2.  Preheat oven to 180C.
3.  After cutting the strawberries into smaller pieces, tap them dry with kitchen towel and coat them with 1 tbsp flour.  Sieve it with a siever to remove access flour.  Set aside.
4.  In a mixing bowl, add in flour, sugar, baking powder and salt.  Mix well.
5.  In the measuring cup, add in oil, then the egg.  Top up with milk to the 1 cup line.  Add in vanilla extract and mix until well combined.
6.  Pour in the wet mixture to the flour mixture, mix with a fork until well combined.  *Note: batter will be thick.
7.  Add in strawberries and mix well.
8.  Fill up the muffin cases till 80% full, sprinkle each muffin with some sugar (for that extra sweet crunchy top!).
9.  Send to bake for 20min.  And viola!

Cut the strawberries into smaller pieces.

Tap dry with kitchen towel.

 Coat them with 1tbsp flour.

Sieve away the access flour.

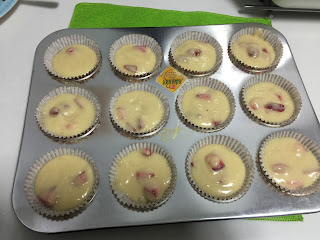
Final consistency of the batter.

Fill about 80% full in muffin cases.

Freshly out from oven!

Topped with some cute toppers :)

All packed for pick-up :)


I have some extra batter, so made 2 blueberries ones for my daughter :)


For my girl to share with her friend :)

Thursday 27 August 2015

Gula Melaka Ogura Cake

Been a while since I made an Ogura cake, and I wanted to clear off some gula melaka (palm sugar), so here it is!  This cake is super aromatic, has an awesome texture and is super super soft & fluffy!  I made it last night and I'm now left with 2 slices only :P

Adapted and modified from Jeannie's recipe.


Ingredients
*6" square tin

(A)
5 egg yolk 
1 whole egg 
1/4 tsp salt 
60g canola oil 
70g gula melaka - chopped into smaller pieces
20g milk
75g plain flour

(B)
5 egg whites
40g castor sugar 
1/4tsp cream of tartar

Method
  1. Grease and lined the base of the baking tin.  Prepare a larger baking tin for waterbath.
  2. Preheat oven to 150C.
  3. Heat up milk in microwave and pour over the chopped gula melaka.  Stir until the gula melaka dissolved.
  4. In a mixing bowl, exceptional for plain flour, using a balloon whisk, beat all (A) ingredients until light and fluffy.  Then fold in the sifted flour.  Set aside.
    *Note: I poured the gula melaka mixture through the sieve when adding it to the batter.  This would ensure that the mixture is smooth with no undissolved lumps.
  5. Using a mixer, beat egg whites until foamy, add in cream of tartar, continue beating and add in sugar in 3 separate batches.  Beat until you attain firm peaks.
  6. Using a balloon whisk, fold the meringue into the yolk mixture in 3 batches.  Change to a spatula for the last fold, and scrap off all the meringue by the side of the mixing bowl.  Be sure there are no more streaks of meringue in the mixture.
  7. Bang the mixture few times on the table top to release air bubbles.
  8. Send the cake to bake at 150C for 70mins, by waterbath method.
  9. Once done, invert on cooling rack to cool.  If you prefer a smooth surface, invert on a non-stick frying pan or cookie tray for 5-10min, unmould and remove baking paper then revert back to cool upright.
Chopped gula melaka into smaller pieces.

Stir and dissolved them with the heat-up milk.

Beat egg white until attain firm peaks.

Egg yolk mixture.

I'm in a little artistic mood, so played a bit with the batter on the cake top :)

Fresh from oven, puffed like a pillow! :P

Smooth top!  And I think the hearts looked really cute!


Superb texture!

So so soft! 

Sliced nicely to served! :)


Wednesday 26 August 2015

Clear Glaze for Fruits

Be it decorating a cake, tart or pie.  If you are using fruits as part of your decoration, you'll need to apply a layer of glaze over it to give it a shiny gloss and to 'trap' the moisture within the fruits.   I've tried a couple of recipes and these two are my favourites to use :)

Photo credits to Baking Project.


Glaze #1
I learnt this during the schooling days from my Home Economic teacher :)

Ingredient
1tbsp apricot jam
1tsp hot water

Method
- Mix both ingredients together, stir to quickly dissolve jam with hot water.
- Apply mixture over fruits with a small brush.


Glaze #2
Recipe origins from this link.

Ingredient
1/2cup water
1/4cup sugar

1/4cup water
1tbsp corn starch

Method
-  Add 1/2cup water and 1/4cup sugar in a small saucepan, over medium heat, stir until sugar dissolved.
-  Mix corn starch with 1/4cup water together and pour this mixture into the hot mixture on the stove, while pouring it in, keep stirring constantly. Allow the mixture to simmer for one to two minutes until it has thickened, then remove the pan from heat.
- Set aside to cool in room temperature,then brush it on the fruits.

Tuesday 25 August 2015

Light Banana Sponge Cake

I have another birthday cake order, and a banana cake was requested.  As I'm coating it with chocolate ganache, I didn't want to make the traditional banana cake and wanted to make a lighter cake instead so that the over-all taste will be balanced (not too heavy and sweet).  Hence, I made a modification from this recipe, and it turns out really great!  It's light, fluffy, refreshing and very very very soft, unlike from the traditional banana cake!  I absolutely love this!

I double the ingredients for my order, and managed to get a extra small loaf from it!

Ingredients
*yields a 6" cake

50g butter 
60g cake flour
1/4tsp bicarbonate of soda
1 ripe banana - mash into puree
3 egg yolks
55g milk

3 egg whites (A size)
50g caster sugar
6g corn starch

Method
  1. Preheat oven at 140C.
  2. Prepare a cake pan with removable base, don’t need to grease or line with baking paper.  Do not use a non-stick pan.  Wrap with aluminium foil as the cake will be baked by waterbath.
  3. Sieve the cake flour and bicarbonate of soda together,  Set aside.
  4. Melt butter in a saucepan, once it melted and simmers, immediately add in the sieved ingredients (in #3) and quickly stir well to combine. 
  5. Transfer the mixture to a bigger mixing bowl and add in milk & banana puree.  Using a hand whisk, mix well to a smooth batter.  Then add in the egg yolks, 1 by 1, mixing well with each addition.  Set aside.
  6. Mix sugar and corn starch together. 
  7. Beat egg whites until foamy, then add in sugar and corn starch mixture gradually and continue beating until the whites reach soft peaks (meringue stand straight up with a little curve at the tip).
  8. Using a hand whisk, mix the meringue into the yolk mixture via 3 batches.  Fold in the last batch with a spatula.  Fold until you do not see any meringue in the batter.
  9. *Note: the batter is more runny than the usual cake batter
  10. Pour the batter into cake tin, from a high height (say, 30cm from baking tin), then tap the tin few times on the table top.  This will help to release the air bubbles in the mixture.
  11. Send to bake at 140C for 25mins, then at 160C for another 25mins.
  12. Once baked, remove the cake from the oven immediately and drop the tin from a high height(say 30cm).  This will help to prevent shrinkage. 
  13. Invert the cake to cool completely before removing it from the tin via hand un-moulding method (just like how you would remove a chiffon cake).  If you want a smooth surface, you can invert on a non-stick frying pan/cookie tray.

Important tips for this recipe:
1. Bake it over low temperature first then increase higher temperature, and always bake it at the lower rack. 
2. You need to have stable meringue; soft peaks (meringue stand straight up with a little curve at the tip).

Very very soft and 'airy'!

For my order, I toppled it up with lots of berries for the filling!

And my end-product!

All packed up nicely! :)


Chocolate Ganache

I always used this recipe to make my chocolate ganache.  It's really simple, a great keeper for decorative use!  And yummy too!
Ingredients
200g dark chocolate compound
1 can Nestle cream (equivalent to 170g) - room temperature

Method
  1. Melt chocolate in microwave for 1min,
  2. Remove from microwave, add in cream and stir to a smooth paste. (If it is still lumpy, you can bring it back to the microwave and heat up for another 10sec, then stir again.  Repeat this step until the mixture is smooth.   But note to do in smooth timing to prevent the mixture from getting burnt).
  3. Cover the mixture with cling wrap and set aside to set (takes around 2hr in room temperature to set to piping consistency). 


I got the original recipe from FB.

 Mixture should reach a smooth consistency with a shiny gloss.

Cover with cling wrap and set aside to set.

Chocolate Muffins with Nutella Buttercream

These were made for an order from my colleague.  And I received very good and positive feedback from them!  Good to make for parties!


Ingredients
*Makes 12 muffins

Muffins
57g butter - melted
1tsp vanilla extract
120g milk + 1/2 tbsp white vinegar (i used apple cider vinegar) - mix together and set aside for 10min
125g brown sugar
1 egg
115g plain flour
30g cocoa powder
1/2tsp baking powder
1/2tsp baking soda
Pinch of salt

Frosting
230g butter - room temperature
240g icing sugar
222g nutella
3-4 tbsp whipping cream
2tsp vanilla extract

Decoration
12 Ferraro Rocher
2 tbsp nutella jam
Some roasted chopped almonds


Method
For muffins:
1.  Prepare muffin tins and preheat oven to 190C.
2.  Sieve flour, cocoa powder, baking powder, baking soda together, then add salt.  Set aside.
3.  Beat egg and brown sugar until well combine, then add in melted butter and vanilla extract.
4.  Add in milk mixture and flour mixture alternately to the batter.
6.  Fill batter into muffin cases till 70%-80% full.
7.  Send to bake for 20mins, then leave to cool completely.

For buttercream:
8.  Cream butter until light & fluffy.
9.  Add icing sugar and combine well.
10. Add in vanillla extract and Nutella, continue creaming until the mixture is well combine.
11.  Add in the whipping cream, 1 tbsp each time, until you reach the desired consistency.
12.  Transfer to piping bag.


Muffin recipe originates from a BC member.  I omitted the chocolate chips & halved the ingredients in this batch.

I got the buttercream recipe online, but cannot remembered exactly from who..

This is the guide on the decoration :)


My final product! :)


Baked these again for my kids!  Very moist & yummy!


Friday 21 August 2015

Snow Skin Mini Mooncakes

This year I decided to make my own mooncakes!  Before the actual period, I started my practising first on this snow skin mooncake recipe that a friend gave me.  It sure is hard work, because you need to do a lots of 'hands-on' work!  I distributed out them to my colleagues and all gave me a thumbs-up for it!  All worth the effort!

This round, I made them in chocolate and matcha flavour :)


Ingredients
*makes about 28 mini moon cakes
For the snow skin:
150g gaofen
150g icing sugar
50g shortening
160g gold water

Matcha flavour:
1 tsp matcha powder
2 drops green coloring

Chocolate flavour
1 tsp cocoa powder
2 drops chocolate coloring

For the filing:
420g lotus paste (I used the no-sugar type from Phoon Huat)
65g of melon seeds

Method

  1. In a mixing bowl, place lotus paste & melon seeds together and knead until both ingredients is well combined.
  2. Divide the lotus paste into portions of 30g each, then roll each portion into balls.  cover with cling wrap and set aside.
  3. Sieve gaofen, icing sugar together.  
  4. Rub in shortening until they resemble bread crumbs, then add in cold water and knead to a dough.
  5. Divide dough into 2 equal portions.
  6. Knead in matcha powder & green coloring by hand until the colour are spread out evenly. 
  7. Repeat step#6 for chocolate flavour.
  8. Divide the dough into portions of 25g each, then roll each portion into balls.
  9. Take a ball of dough, and flatten it until you get a thin circle.  Place a ball of filing in the center and wrap and seal it up.  Roll again to smooth the surface.  Repeat steps for the balance.
  10. Sprinkle some gaofen into the mould, pour out the access flour.  Press down the dough to the mould for imprint.  Repeat steps for the balance.
  11. Put the mooncakes in a container and store them in the fridge.
Rub in shortening to the gaofen mixture

Knead lotus paste with the melon seeds until 

Roll up the filings

Knead in the colourings and flavourings

This are the mini moulds that I used.

Parts of my completed products.  I think they look quite cute :)

Packed up to share with my colleagues :)

-----------------------------------------------------------


My last batch for 2015! :)